Classic Italian Garden Salad

Classic Italian Garden Salad 
Serves 4-6 

Whenever we bring this salad to a party people are always grabbing for second helpings!  It is fresh & punchy, with lots of colour and adaptability.   The dressing can be made well ahead of time, in a blender, just be sure to bring it to room temp before serving.   

1 large clove garlic
1⁄4 cup white wine vinegar
1⁄2 tsp.celery salt
1⁄4 tsp. mustard powder
1⁄4 tsp. dried oregano
1/4 tsp. sugar
2 tbsp. grated parmesan cheese
1⁄2 cup olive oil
Good pinches each of salt & freshly ground black pepper
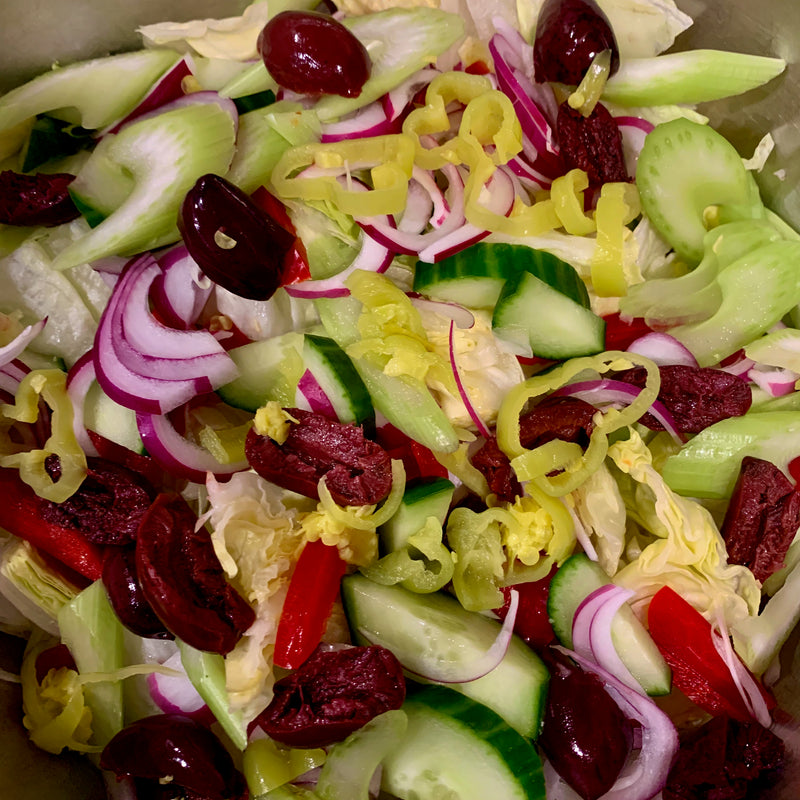
1 head of lettuce (iceberg), torn 
1⁄2 red onion, thinly sliced 
1 tomato, in wedges 
Celery & cucumber, sliced (optional) 
6-8 Pepperoncini (pickled) peppers sliced
6-8 Black olives pitted & halved 

  1. Thinly slice red onion and place in a small bowl with cold water and a good pinch of salt. Set aside.
  2. Roughly chop lettuce and place in a bowl. Wedge tomato. Add olives and pepperoncini to bowl, add cucumber & celery if using. 
  3. Make Vinaigrette: Place garlic, vinegar, celery salt, mustard powder, oregano, sugar, 2 tbsp. of parmesan cheese & a good pinch of each salt and pepper in blender. Blend on high for 20-30 seconds.
  4. Reduce blender speed and drizzle in olive oil. Pour into a jar and set aside until ready to toss salad.
  5. Leftover vinaigrette will keep in a jar, refrigerated for a week. Shake well before using.


Read more →

Quick Shrimp Appetizers

Quick Shrimp Appetizers
Serves 4

   The versatility and speed of shrimp never gets old.  It impresses with just the simplest of adornments and comes together in a snap.   For this recipe we've treated ourselves to the already-pink hued Argentinian Shrimp, a large shrimp that has a lobster-esque flavour.   Cooking the shrimp with the shell ON at the start is two-fold: it ensures super delicate and moist shrimp, but almost more importantly, it intensely flavours the butter that you are going to incorporate into the sauce.   

   Be sure not to over-toast the baguette--you want a bit of a plushy interior here.     
   Make Ahead: make the shrimp mixture 4-5 hours ahead of time and keep refrigerated.   Bring to room temperature about 30 minutes before serving on freshly toasted or grilled bread.    


12 large Argentinian Shrimp
2 tbsp. butter
1/2 Lemon, juice & zest
1/2 rib celery, finely diced
1/2 bunch of chives, or a couple green onion, finely sliced
1/2- 1 tsp Togarashi spice or other chilli spice
1/2 cup mayonnaise
12 baguette slices

  1. Butterfly the shrimp (leave the shell on) and cut along the back of the shrimp, opening it up but do not cut all the way through.

  2. Heat a pan over medium heat, swirl in 1 Tbsp of butter and add shrimp, flesh side down. Squeeze some lemon juice on shrimp. Cook, tossing gently in lemony butter until just cooked.When the shrimp are cooked they will turn more opaque and begin to curl.   

  3. Remove and allow to cool, then peel the shrimp.  

  4. In a small bowl mix together mayonnaise, celery, togarashi and lemon zest. Add cooled and peeled shrimp.

  5. Lightly toast bread in a hot for a couple of minutes and top with shrimp mixture, or, alternatively toast baguette whole until crusty on the outside, then slice and top with shrimp.

Options: double this recipe and mix with cooked pasta for a fantastic pasta salad! 

Read more →

Spice Roasted Fish Tacos

Spice Roasted Fish Tacos 
Makes 8 tacos, can be doubled! 

 Oh how we love this recipe!   If you have 30 minutes you can make these incredibly impressive tacos.   Hydrating the spices first in water & oil to make a paste blooms their flavour compounds, more so than just sprinkling the spices on dry.  

Just two toppings are necessary for these tacos, a fresh cucumber salsa and a slick of lime mayo.   

Recipe testing proved that flour tortillas were far superior for these tacos, as opposed to corn tortillas.   Be sure to warm them up in the oven, or 30 seconds a side in a dry frying pan. 


1 tsp. smoked paprika
1⁄2 tsp. ground coriander
1⁄4 tsp. each turmeric, black pepper & chilli powder 1/8 tsp. ground cinnamon
2 tbsp. boiling water
1 tbsp. neutral oil
3⁄4 lb Newfoundland Cod, cut into 8 strips

1⁄2 English cucumber, seeds removed and diced
Juice of 1 large lime (hold a little back for the mayo)
1⁄4 bunch fresh cilantro, finely chopped

juice of 1⁄4 lime
pinch of salt
1⁄4 cup mayonnaise
8 flour Tortillas

  1. Preheat oven to 425°F
  2. In a small, heat-proof dish mix together all of the ground spices. Stir in boiling water and allow to hydrate for about a minute before stirring in oil
  3.  Place the cod strips on a parchment-lined baking sheet; season well with salt and then drizzle the spice mixture all over the pieces. Set aside for 5 minutes while you make the salsa and mayo
  4. Mix together diced cucumber with salt. Stir in lime juice and cilantro
  5. For the mayo, simply mix together lime juice, salt and mayo 6. Bake cod for 7-8 minutes, until it just begins to flake
  6. Warm tortilla shells in the oven for 30 seconds and then assemble tacos!
  7. Warm tortilla, lime mayo, cod and cucumber salsa-enjoy!

Read more →

Smoked Paprika Grilled Chicken

Smoked Paprika Grilled Chicken 
Serves 4

As much as we want to add so many herbs and spices to our grilled meats, as far as we're concerned, there's only one that needs to be in your pantry: Smoked Paprika, or pimentón.  There are several different types of Spanish paprika, made from different kinds of peppers.

  • Pimentón Dulce or Sweet Paprika: Round red peppers make this mild, light orange paprika.
  • Pimentón Agridulce or Medium Hot Paprika: Longer, dark red peppers make a medium-hot paprika.
  • Pimentón Picante or Hot Paprika: Made from any of several different types of long red peppers.  This paprika really can pack quite a punch!  

Mix pimentón with a pinch of cumin and sea salt for a multi-purpose Spanish salt, delicious on hard-boiled eggs, sautėed shrimp, in rice dishes and, of course,  grilled chicken.   

Look to buy smoked Spanish paprika in little tins at specialty shops or home stores!  

The key to this type of chicken is paying attention.  Sure, there are many ‘set it and forget it’ meals that we love, but this one is for when you want nothing more than to become one with your grill or fire, baby that chicken to achieve the most glorious char-grilled crispy skin and take it off as soon as the pieces are done.  Cook this over an open fire, seated on a camping chair or on your back deck with a cold one!  


1 large whole chicken, flattened, or cut into bone-in, skin-on pieces
1 heaping tbsp. Kosher salt
2 tsp. Pimentón of your choice, or a blend
2 tbsp. Oil 

  1. Prepare coals, grill or pellet-grill.  Ideally not too hot, about 375℉, keeping in mind you’ll be moving the chicken around to avoid any flare-ups. 
  2. Place chicken in a bowl or on a sheet pan and thoroughly rub in the salt, pimentón and oil.  Feel free to do this several hours ahead of time, or even the day before.   
  3. Get grilling!   Start skin-side up for the first 10-15 minutes, then turn onto skin to begin to crisp, moving the chicken away from flaring hot spots as you need to.   Once desired colour is achieved on skin side, turn back over onto the bones to continue to cook through.  
  4. You’ll know your chicken is cooked through when the legs start to naturally break free.   Total time is about 1 hour.   
  5. Rest & carve.   We like to cut the legs in 2, the breast in 3 pieces using a bit of force and a sharp knife.   
  6. A simple garlic mayo would be delicious with this on the side!


Read more →

Bacon & Wild Mushroom Crostini

Bacon & Wild Mushroom Crostini 
Serves 4

Want to get your kids to eat mushrooms?   Or anyone for that matter?  This is the recipe to use!   The revolutionary cooking method uses WATER for the most crispy and caramelized of mushrooms.   If you thought garlic mushrooms involved frying garlic in butter and adding in mushrooms, think again.  This method reverses those flavours to get the most out of the mushrooms first, then shines them up at the end with butter, garlic, shallots & herbs.   And of course we prime the pan at the beginning with some bacon!  

This pan of bacon-y goodness can be served on crostini (which we lightly toast in bacon fat) or is perfect tossed with pasta and a bit of cream, or on top of a steak.  One of our kids just likes to eat a bowlful of this mixture.   

This is your opportunity to try different types of mushrooms, available at specialty stores or your local farmer's market.  Oyster mushrooms come in clumps that you simple tear into manageable sized pieces.  Shiitake mushrooms add a lot of texture with their natural density.  If you can get your hands on lions mane mushrooms, they are a real treat (and check out all the health benefits!)   And of course your portabella (do not skip the technique below!) and cremini are readily available and necessary to carry all the flavours.   

3 slices bacon
1 1/2 lbs mixed wild mushrooms
1 clove garlic
1 large shallot
1 sprig rosemary
3-4 sprigs thyme
2 tbsp. Butter
8-10 baguette slices
2 tbsp. Grated parmesan cheese

  1. Preheat a frying pan over medium heat.
  2. Chop bacon and add to pan to render.
  3. Once crisp, remove to a bowl.
  4. Slice bread and add to bacon fat in pan to toast, adding a little butter/oil if necessary. Remove and set on a platter.
  5. Slice mushrooms.
  6. Add a little oil to the pan, followed by mushrooms. Sizzle on high heat, then add a good splash of water, about 1/4 cup.   Cook undisturbed for about 5 minutes.  You will hear your pan change sound as the water evaporates.   Lower heat once this happens and cook a further 1-2 minutes to ensure all water is evaporated and mushrooms are getting crispy.   
  7. Slice garlic & shallot, chop rosemary & thyme.  
  8. When mushrooms are crisp, stir in butter, garlic, shallot, rosemary, thyme & bacon. Cook for about 2 minutes then top on bread.
  9. Garnish with parmesan cheese.

Read more →

Rhubarb Fool

Rhubarb Fool

Makes 4-5 cups or about 6 servings 

No my friends, Jody is no fool, not when you can purchase rhubarb this large!  Buying rhubarb a little later in the Spring at your local farmer's market or roadside stand is not a bad idea--the rhubarb is large, tangy and inexpensive.   

We like to buy it, chop it up and either use it right away in a pie or crumble, but we always save 3 or 4 chopped cups in a zip-top bag for the freezer.   No joke, it might sit there for 5 or 6 months, but we you need a quick and easy dessert in the winter, this can be done in a snap and is a welcome fruity burst of Spring.  

So what is a Rhubarb Fool?  A fool is a dessert whose name comes from the French word fouler, which means “to crush”. Crushed fruit and whipped cream are folded together and chilled, producing a light and mousse-like dish.  It can't be simpler.   We like to serve it with triangles of baked puff pastry, either homemade  (which also stores nicely in the freezer) or store bought.  You can also just serve it out of a dessert cup or martini or coupe glass with a couple of cookies or biscotti on the side.  

Recipe: 

4 cups chopped rhubarb (fresh or frozen) 
1/2 cup packed brown sugar (more or less to taste) 
1 cup 35% cream
1/4 cup white or powdered sugar 
1 tsp. vanilla 
Baked triangles of puff pastry (optional) 

  1. Place rhubarb and brown sugar in a sauce pot with 1/2 cup of water. 
  2. Bring just up to the boil, reduce heat to low and simmer for 10-20 minutes or until fruit is tender and saucy. 
  3. Remove from heat and cool to room temperature or chill completely in a bowl. 
  4. Meanwhile, whip the cream in a chilled bowl with either a whisk or your electric mixer, sprinkling in the white sugar as you go.  Whip until just past soft peaks.   Stir in vanilla. 
  5. When rhubarb is cooled fold about 1/2 cup of the whipped cream into the rhubarb first to lighten the texture.   Then fold in remaining whipped cream.  
  6. Serve chilled as discusses above.  

Read more →

Buttermilk Chive Dressing

Buttermilk Chive Dressing
Makes about 2 cups

Always in our fridge, this quick, easy & versatile dressing is light & creamy dressing, but without any preservatives, thickeners, gums, or things you don't necessary need or want when dressing fresh, local produce.   

Be sure to source out high-fat, good quality buttermilk.   Harmony Organic brand is our go-to, but if you can't find a higher fat buttermilk, here's a couple of options:  replace 1/2 cup of the buttermilk with sour cream, OR increase the amount of mayonnaise to 4 tablespoons.   

Fresh garden chives were an easy grab for this, but dill, parsley or even a bit of spring onion would work well.   The key is fresh lemon juice and a really good amount of sea salt & freshly ground black pepper.   

This dressing is ideal on buttery lettuces or spinach, but add in some blue cheese or cheddar cheese and dress that broccoli-bacon salad, or a wedge salad with steak!   

1 clove of garlic, cut in half for easy blending
Juice of 1 lemon 
1 tsp. good quality sea salt
5-6 turns of freshly ground black pepper 
1 tsp. Dijon mustard 
2 tbsp. mayonnaise 
a good handful of snipped chives 
1 1/2 cups Buttermilk 

  1. Place garlic, lemon, salt, pepper, Dijon, mayonnaise and chives in your blender.   Blend until smooth, 30-45 seconds.  Add just a little of the buttermilk if you need to accomplish this. 
  2. Just stir in buttermilk (or blend for 2 seconds).  
  3. Pour into a jar and enjoy! 
  4. Will keep for a week or more in the refrigerator. 

Read more →

Easy Mexican Chicken Pozole

Easy Mexican Chicken Pozole 
Part soup, part chili, this is great way to introduce Mexican dried chiles into your pantry.  This recipe uses leftover cooked chicken and requires very little chopping. Adjust the spice level by adding more stock if you like. It's about a 3-4 out of 10.  Garnishes are only limited to your imagination...however, the shredded lettuce was the surprise hit!   Serves 6.  

5 dried guajillo chilies, stemmed & seeded 
2 dried ancho chiles, stemmed & seeded  
2 cups canned whole tomatoes and their juices 
2 cloves of garlic, peeled
1/2 of a white or yellow onion 
½ tsp. each dried cumin & oregano 
3 tbsp. oil (any kind, or chicken or bacon fat!) 
4 cups chicken stock or water 
1 large can of hominy, drained and rinsed 
2-3 cups of leftover shredded chicken 
Salt, to taste 

Garnishes (no rules, use as little or many as you like): 
Sour Cream or Crema 
Queso Fresco or Shredded Cheese 
Chopped Cilantro 
Chopped White or Red Onion 
Thinly sliced Radishes 
Finely shaved iceberg Lettuce or Green Cabbage
Diced Avocado 
Hot Sauce 

  1. Toast chilies in a frying pan over medium heat, moving frequently until blistered but not burnt
  2. Place in a heatproof bowl, cover with very hot tap water boiling water and let stand until softened, about 10 minutes. 
  3. Add to a blender along with tomatoes, garlic, onion, spices and a good pinch of salt. 
  4. Blend until smooth (this can be made and refrigerated up to 3 days in advance).  
  5. Warm oil or fat up in a pot large pot, then pour in salsa.  Rinse out the blender with about 1 cup of water to your blender to clean, and add that to the pot as well.  
  6. Let simmer over medium-low heat until colour deepens and sauce thickens slightly, about 15 minutes, stirring occasionally.   
  7. Stir in chicken stock or water and hominy.  Bring to a high simmer for 5 minutes then reduce to low before adding chicken.  
  8. Stir in cooked chicken only about 10 minutes before serving. 
  9. Ladle into bowls and garnish as you like!   


Read more →

Sesame-Tuna Lettuce Wraps

Sesame Tuna Lettuce Wraps
We always need a new, quick, make-ahead and impressive appetizer to start off a dinner get-together, or offer to bring to a party.  This recipe could also be doubled or tripled if you hosting a large gathering!   We found small, but really tightly packed leaf lettuce heads at T&T Supermarkets.  Iceberg lettuce would also work! 

Makes about 12 

1 8-9oz thick piece of best quality Tuna 
1 tbsp. miso paste 
2 tbsp. soy sauce 
1 tsp. sesame oil
3 tbsp. mixed black & white sesame seeds

1/4 cup rice wine vinegar 
1 tbsp. sugar 
1/2 cucumber, thinly sliced 
1 carrot, thin julienne (use a peeler or mandolin) 

2 green onions, very thinly sliced 
2 radishes, very thinly sliced 

About 12 small lettuce leaves (see note above)

Oil, as needed 
Flaky sea salt, as needed 
Sriracha (optional)

  1. In a small bowl whisk together miso paste, soy sauce & sesame oil. 
  2. Place tuna in this mixture, and flip over from time to time to get marinade in on two sides.  The tuna will absorb it over time, about 30 minutes total.  
  3. Place sesame seeds on a plate and set aside.  
  4. Meanwhile, in a small bowl whisk together rice wine vinegar and sugar until sugar is dissolved.  Add cucumbers and carrots.  Let macerate 30 minutes, or up to a day ahead of time.  
  5. Add thinly sliced green onion and radishes to a small bowl with cold water.  This will help the onions curl and the radishes crisp.  This can also be done 30 minutes or up to a day ahead of time. 
  6. Cook tuna:  preheat a small frying pan (cast-iron is great) over medium-high heat.  While it is preheating, remove tuna from marinade (doing your best to swoop up as much marinade as possible) and firmly dip two sides into the sesame seeds.  
  7. Add a little oil to the pan followed by tuna.  
  8. Cook for 1-2 minutes per side.  Remove to a cutting board.  Let cool while you assemble your platter. 
  9. Arrange lettuce leaves on a platter, drain and top with a few cucumber slices and carrots on each leaf.  
  10. Slice tuna into 1/4 inch slices.  Remember, there is no grain to worry about on tuna, so slice it for how it makes sense to present it.  
  11. Add 1-2 slices to each lettuce leaf.  Top with green onion spirals and 1-2 radish slices.  Add a few flakes of sea salt on each piece of tuna.  If you like some spice, add a couple dots of sriracha.  
  12. Can be made up fully about 1 hour ahead of time.  Enjoy!!

Read more →

Parsley-Pumpkin Seed Pesto

Parsley-Pumpkin Seed Pesto
Use on pasta, rice, as a mayo, as a bruschetta, or add some lemon juice for the perfect marinade for chicken or grilled vegetables.  

Makes about 3/4 cup

1 clove garlic (7g), cut into 2-3 pieces
1⁄4 tsp. good quality sea salt, plus more for garnish
1/4 cup (30g.) pumpkin seeds
1/3 cup (40g.) grated parmesan cheese (we used Grana Padano)
1⁄2 bunch (40g) Italian Flat Leaf Parsley, leaves only
3-4 tbsp. olive oil plus more for drizzling

  1. Using a mortar and pestle or a small food processor, start with the garlic, salt, pumpkin seeds and parmesan cheese until coarsely chopped.
  2. Begin to add in the parsley and pound with pestle or pulse in food processor.
  3. Once all is well combined, scrape out with a spatula and stir in olive oil.  This is key!  Do not process with the olive oil.  
  4. Season to taste with salt.
  5. Refrigerate topped with extra olive oil to keep it nice and green, 7-10 days.  Freeze for longer.  

Read more →